User's Manuals / Advanced Central Vacuum Electric Powerhead
Use, Routine Care & Maintenance
ADVANCED ELECTRIC POWERHEAD
These Electric Powerheads have been carefully designed and manufactured for long life, reliable performance and convenient cleaning. They are designed to do the most of the cleaning for you. They move easily and do not require downward pressure for thorough cleaning. As with any tool with moving parts, caution must be exercised while using Electric Powerheads. Please read and save these Operating Instructions.
SAFETY PRECAUTIONS
| 1. | Keep hair, hands, and feet away from rotating brush while the Electric Powerhead is running. | 3. | Do not attempt to service or unclog Electric Powerhead while unit is running. |
| 2. | Remember that Electric Powerhead operates whenever they are connected to a running vacuum. If children are present, make sure to turn vacuum system off when leaving powerhead unattended. | 4. | Avoid picking up water or spilled liquid with your Electric Powerhead. The vacuum system is designed for dry pick up only. |
Top View
Use of your Electric PowerheadFloor surface selector
Carpet and Rug: • When using the power nozzle for carpet and rug cleaning, push the floor surface selector switch to “ON” ( L ). This setting provides the suction and brushroll action necessary to deep clean carpets. Note :The surface selector switch must be in the “OFF” position before turning the vacuum on. Hard Surfaces: • The power nozzle can be used for cleaning hard surfaces such as wood, linoleum, vinyl, rubber, tile, sealed cork, and terrazzo. • To set the power nozzle for hard surfaces, push the floor surface selector switch to “OFF” ( L ). This setting provides suction and no brushroll action. Carpet height adjustment & indicator
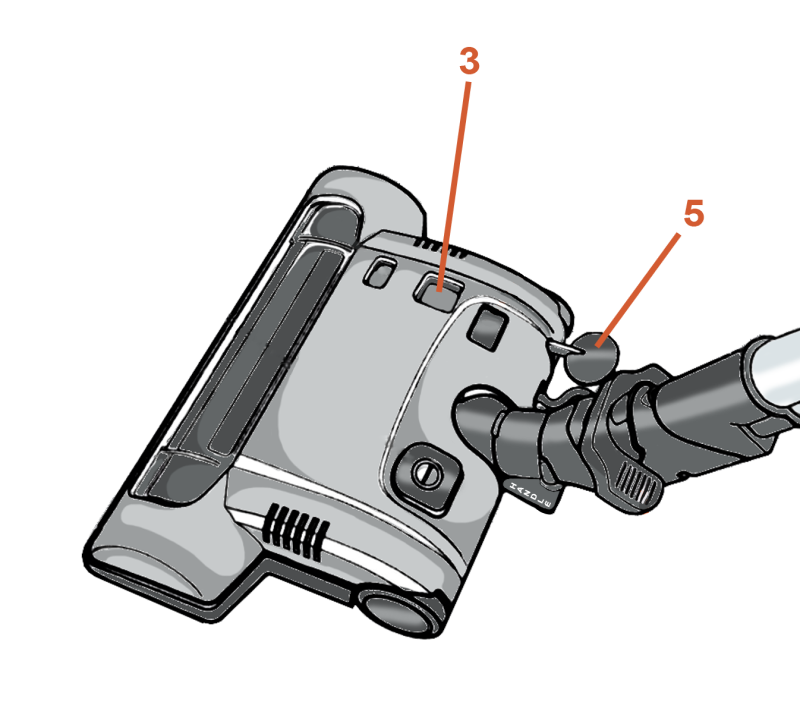
• The power nozzle has a carpet height adjustment. The indicator ( 3 ) shows what the nozzle is set on. There are 6 levels. Number 1 is used for short pile carpet and 6 is for deep pile. Press the pedal to adjust nozzle height up or down. ( 5 ). Power nozzle handle position
• The handle has two positons when used with the power nozzle: upright and operating. • The handle is locked when in the upright position. • To lower handle to operating position, press the handle release pedal ( 6 ) on the back of the power nozzle and pull the handle back. Dirt sensor
• The dirt sensor will turn red ( 4 ) when the power nozzle is detecting and picking up dirt. • The light will turn green when no dirt is detected. Brushroll
• The brushroll foot switch is located on top of the power nozzle ( 1 ). Both switches must be turned on to activate the agitator brushroll. Floor surface selector switch - plus - Brushroll foot switch ( 1 ).
MaintenanceBelt replacement The belt in your power nozzle drives the agitator. II has been designed specifically for use in this cleaner and is important for effective operation. When to replace: • The belt should be checked from time to time to be sure it is in good condition. To check remove the hood ( see following section ). • Replace the belt if it is stretched, cut, or broken. How to replace: Always follow the procedure to check or replace the belt.

Brushroll replacement
When to replace: • When agitator brushroll brushes are worn, the brushroll should be replaced. • To check condition of brushes, move edge of a card across bottom plate while turning brushroll. To maintain cleaning effectiveness, replace brushroll if brushes do not touch card. How to replace: Always follow the procedure to check or replace the belt.
Headlight replacement
When to replace: • The light is on whenever the vacuum is turned on. If the light does not ignite, it might be burned. Follow the procedure to check or replace it. How to replace: Always follow the procedure to check or replace the belt.
Nozzle blockage If the nozzle becomes clogged, use the following procedures to check for and clear the blockage.
What to do • If blockage is severe enough the nozzle will shut off. After the block age is cleared you must push the overload protection reset button ( A ) before the nozzle will operate again. • Make sure power nozzle is discon nected from wand. Then check for blockage in nozzle connection ( B ). • There is an additional panel on the bottom of the nozzle ( C ). This open ing provides a secondary place to check and clear blockage.
TroubleshootingCheck these first Service problems that appear to be major can often be solved easily. You can be your own troubleshooter by reviewing this guide. If Power nozzle won’t turn ON:
If Power nozzle still does not work properly: • Contact your dealer for service.
|