


User's Manuals / Rug Rat Handheld Air-driven Brush
RUG RAT INSTRUCTION MANUAL ZAS024
Routine Care & Maintenance Hand-Held Turbine Powerhead

These Turbine Powerheads have been carefully designed and manufactured for long life, reliable performance and convenient cleaning. They are designed to do most of the cleaning work for you. They move easily and do not require downward pressure for thorough cleaning. As with any tool with moving parts, caution must be exercised while using these Turbine Powerheads. Please read and save these Operating Instructions.
SAFETY PRECAUTIONS
| 1. | Keep hair, hands and feet away from the rotating brush while the Turbine Powerhead is running. | 3. | Do not attempt to service or unclog tool while unit is running. |
| 2. | Remember that Turbine Powerheads operate whenever they are connected to a running vacuum. If children are present, make sure to turn vacuum system off when leaving powerhead unattended. | 4. | Avoid picking up water or spilled liquids with a Turbine Powerhead. The vacuum System is designed for dry pick-up only. |
Instruction for this Turbine Powerhead
[A] Attaching the RugRat™ Turbine Powerhead
To attach your metal wand and/or curved hose handle, simply twist into hand held brush neck until it fits snugly (See Figure. 1). To detach wand or curved hose handle, simply hold neck of Hand-Held Powerhead and pull apart with a twisting motion.

[B] Operating Procedures
Your Hand-Held Turbine Powerhead has no ON/OFF switch. Whenever it is attached to an operating vacuum system, it will be running.
[C] Cleaning the Brush Assembly
Turn off vacuum system and disconnect Power Brush. Threads, string, carpet fibre, fuzz, and pet hair can wrap around the cleaning brush. These should be removed by unwinding them by hand or carefully cutting with scissors.

Note: Baseplate should be removed to clean properly.
[D] Cleaning Intake Nozzle
If Turbine or intake nozzle become obstructed.
| 1. | Turn off vacuum system and disconnect Turbine Powerhead. |
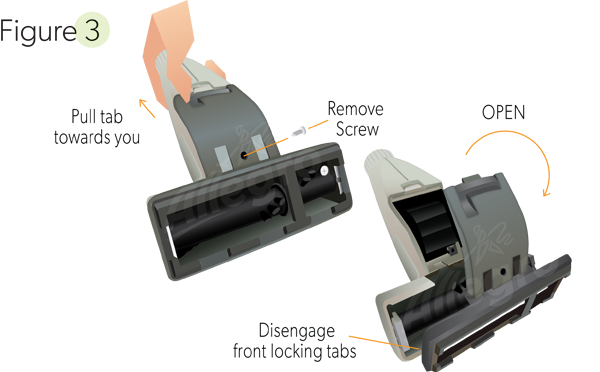
| 2. | Turn hand held powerhead over and remove screw from center of base plate. |
| 3. | Remove base plate by first sliding back of the brush. Next, pull the rear of the plate away from housing and slide forward to disengage front locking tabs (See Figure. 3) |
| 4. | Remove debris from intake port and/or turbine. |
| 5. | Reassemble by inserting the tabs on the front of the base plate into the slots in the base housing, then secure the back of the base plate with the latch. |
[E] Belt Replacement
Remove base plate and belt cover (right side of powerhead) by removing screw (See Figure. 4). Next, remove belt from pulley (may help to turn cleaning brush backwards slightly). Pull belt and brush assembly out and replace belt. Before replacing base plate and belt cover, make sure a "2" is showing at both ends of brush assembly (this number is stamped right on the bearing housing) (See Figure. 5).

Also make sure also that no brush bristles are caught between the belt and brush roll gear. If brush bristles are worn, see BRUSH ROLLER ADJUSTMENT.

[F] Brush Roller Adjustment
To adjust brush to compensate for bristle wear, remove base plate. Next remove the belt cover by removing the screw. Finally, Remove the belt from the pulley (it may help to turn the cleaning brush backwards slightly). Pull the brush assembly out. Turn brush assembly over and reinsert so that number "1" is showing at both ends (See Figure 6).

Before replacing base plate and belt cover, make sure no bristles are caught between the belt and brush roller gear.
Note: The brush roll comes from the factory with a "2" showing at both ends of the brush roll assembly.
Other Repairs
For repairs or service beyond those described above, please contact your servicing distributor or dealer.
Troubleshooting Turbine Powerhead
CAUTION: Moving parts -- disconnect from vacuum system before servicing
RugRat Turbine Powerhead
Turbine Runs Slow | Brush makes knocking noise | Brush bounces in use | Brush hard to push | Section / Paragraph | |
| POWERHEAD INSTRUCTION MANUAL | |||||
| Check bottom plate | • | • | • | • | C/D |
| Check belt and tension | • | • | • | E | |
| Check beater bar | • | • | • | • | C |
| Check all intake areas for obstructions and brush roll rotation direction | • | • | • | • | D/E |
Central Vacuum Cleaning System
| NON-FILTERED MODEL | FILTERED MODEL | ||
| 1. | Check dirt receptacle | 1. | Check paper bag |
| 2. | Check guard screen | 2. | Check cloth bag |
| 3. | Check all filter screens | 3. | Check air filters |
| 4. | Check hoses for air leaks | 4. | Check hoses for air or obstructons |
Limited Warranty
Allegro Central Vacuum Systems Inc. warrants that the hand held turbine powerhead, when used for household purposes, pursuant to Seller’s instructions, will be free from defects in materials and workmanship for a period of, (3) years from the date of the initial consumer purchase. Allegro Central Vacuums Inc. warrants that the hand held turbine powerhead, when used in a commercial application pursuant to Seller’s instructions, will be free from defects in materials and workmanship for a period of (90) days from the date of the initial consumer purchase. This warrant is limited to the replacement of defective parts and any costs of shipping shall be incurred by the purchaser. THIS WARRANTY IS EXCLUSIVE AND IS IN LIEU OF ALL OTHER WARRANTIES, EXPRESS, IMPLIED, OR STATUTORY, AND ALLEGRO CENTRAL VACUUMS, INC. SPECIFICALLY DISCLAIMS RESPONSIBILITY FOR CONSEQUENTIAL AND INCIDENTAL DAMAGES, AND LIMITS THE IMPLIED WARRANTY OF MERCHANTABILITY TO THE PERIOD OF EFFECTIVENESS OF THIS EXPRESS WARRANTY.
Replacement Parts

| Item No. | Part Description | Part No. |
| 1 | Swivel | 6321-2 |
| 2 | Sub Assembly Turbine Shaft | 6322 |
| 3 | Belt | 6323 |
| 4 | Swivel Seal (2 required) | 6324 |
| 5 | Latch Spring | 6325 |
| 6 | Latch | 6326-2 |
| 7 | Housing Assembly Half | 6780-2 |
| 10 | Sub Assembly Housing | 6757-2 |
| 11 | Belt Cover | 6330-2 |
| 12 | Screw 6-9 x .750 (3 required) | 6331 |
| 13 | Brush Assembly | 6332 |
| 14 | Base Plate with Gasket & Bumper | 6755-2 |
| 15 | Gasket | 6334 |
| 16 | Bumper | 6335-2 |
| 17 | Screw 6-19 x 1.2 (1 required) | 6336 |
| 19 | Screw 6-19 x .500 (1 required) | 6339 |
| 20 | Rubber Plug | 7237 |